


Today, in the world of Internet, everyone wants to create a website for themselves or their business. Internet marketing has evolved several folds and your absence here can cause you a serious loss. Your business, small or big, must have a website if you really want to evolve and make good profits.
You might be thinking that starting up a website will involve great costs which you might not be able to invest in. How about if I guide you on developing your website at minimum amount with some good discount coupons for you?
Creating your website has turned to be a lot easier than it was a few years back. With much simplified techniques and smart content management systems like WordPress, things have turned simpler. Now let me introduce you with the sequenced steps involved in creating your website.
- Signing Up with the service providers
- Selecting and buying a hosting plan
- Searching and buying a domain name
- Directing your domain name to your hosting space
- Adding your domain name to your hosting server
- Installing WordPress on your website
- WordPress Installation
These simple #7 steps will help you in hosting your website within few hours. Before explaining you about all the above steps, I prefer using Godaddy service provider for buying domain names and hosting spaces. They are really good at it and also offer huge discounts and efficient customer support.
#1 Getting Started – Signing Up
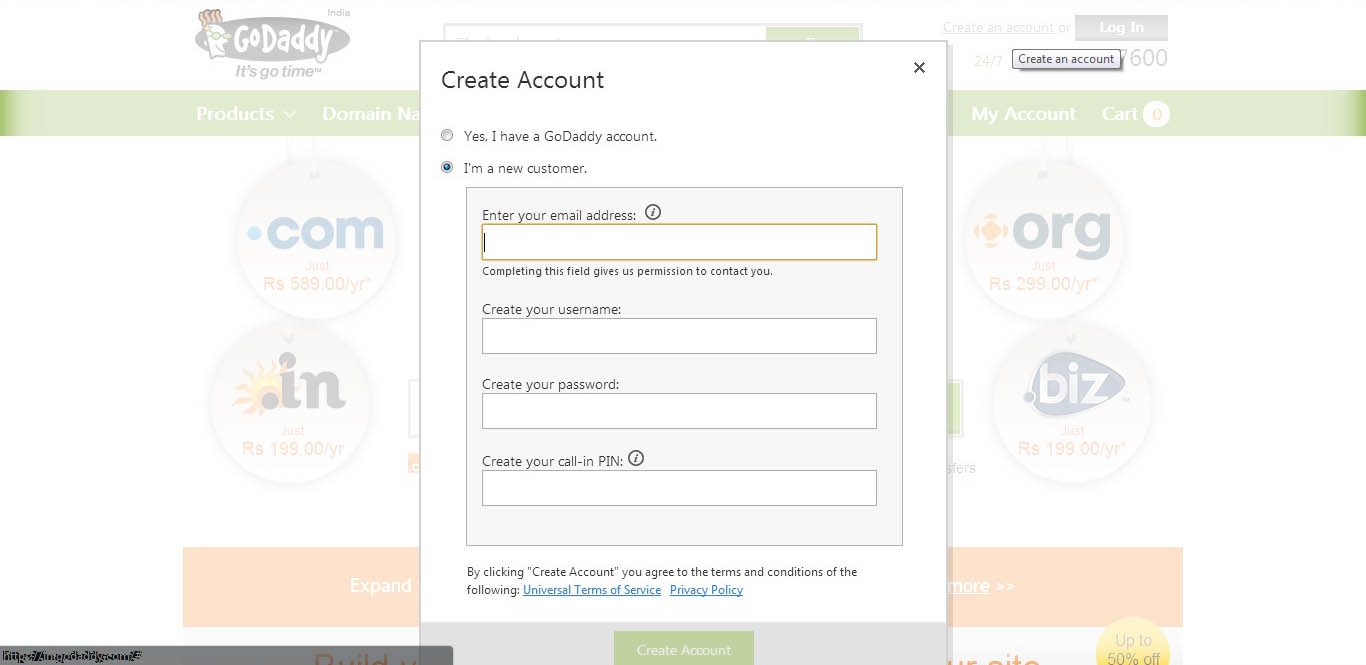
The first thing you need to do while creating your website is signup with your service provider. On the
Godaddy Homepage you will find the ‘Create an account’ link on the top right hand corner. Clicking on this link will ask you details about your email address, username you want to use, password and a call-in PIN which is a four digit number (Godaddy usually uses this pin when you call their customer support).
On successful signup, you’re directed to the home page where you can start your search for new domain.
#2 Selecting and Buying a Hosting Plan
Usually hosting plan is supposed to be bought later after buying a domain name. However, why I’m suggesting you to buy a hosting plan earlier is the free domain offer given by Godaddy. The service provider usually gives you an offer of getting a free domain name on a purchase of a hosting plan. Hence, I suggest you to buy a hosting plan prior to your domain.
Godaddy offers you 3 hosting plans that are customized according to usual business needs. The Economy hosting plan has been customized for 1 website with 100 GB disk space. Usually this plan works fine for small businesses.
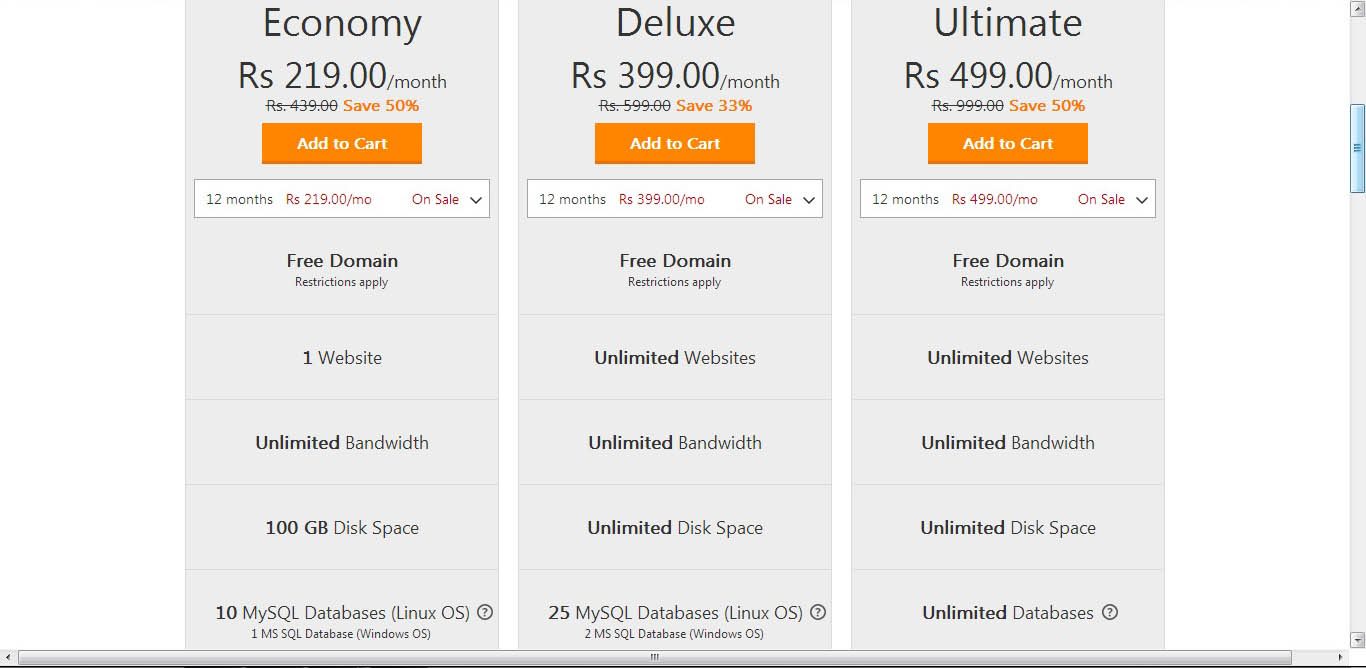
The other hosting plan which I usually recommend for bloggers is the Deluxe hosting plan. Customized for unlimited websites (it shows unlimited but I guess it’s restricted to 25) and unlimited disk space, the plan works fine if you are planning niche sites.
Godaddy also offers you with a professional hosting plan which in true sense offers you unlimited website hosting and disk space.
If Godaddy has an active free domain name offer, it asks you to enter the domain name you want to select. However, before selecting your domain name, I suggest you to go through the below point.
#3 Searching and Buying a Domain Name
Buying a domain name has become one of the difficult tasks. Please go through my article ‘Guide on Selecting a Domain name for Business’ before you actually buy one for yourself. This post will help you in getting yourself an appropriate domain.
Once you complete the process of selecting the hosting plan and domain name for yourself, you are redirected to your cart. Once in cart, you can payout the price which adds the hosting and domain name to your account.
All the links and banners that redirect you to the Godaddy page from this website offer you great discounts. Using these links not only help you in getting discounted prices but also helps me in getting a commission towards each purchase you make.
#4 Getting Your Hosting Space IP Address
Once done with the domain and hosting buying procedure, you need to make some tiny settings that sync your domain name with the hosting. Following procedure will help you in making these settings:
Once done with the domain and hosting buying procedure, you need to make some tiny settings that sync your domain name with the hosting. Following procedure will help you in making these settings:
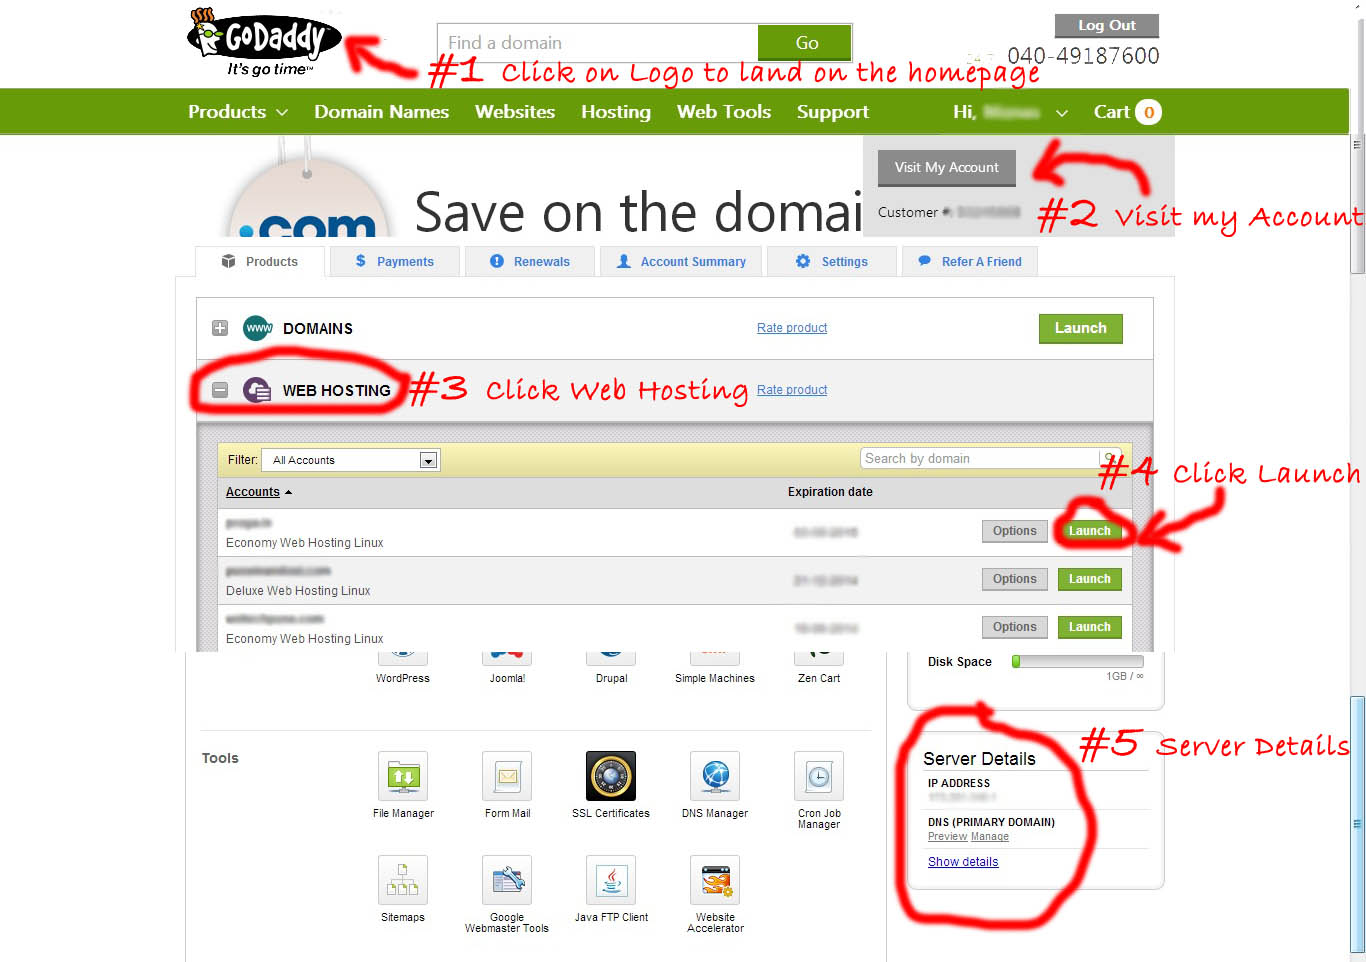
- Go to your Godaddy Home Page
- Hovering the cursor on your Name will give you an option – ‘Visit My Account’ that takes you to your account page
- On this page, select Web Hosting, that gives the list of all the hosting plans you possess
- Click on ‘Launch’ option of the Web Hosting Plan which redirects you to the Hosting Details page
- Scrolling a bit down on this page gives you the server details on right bottom side
- Make a note of your IP Address
#5 Syncing Your Domain Name with Your Hosting Space
This step is a bit technical and would need some editing in the Domain Name Servers (DNS). However, the below given steps and image would simplify your task to a greater extent.
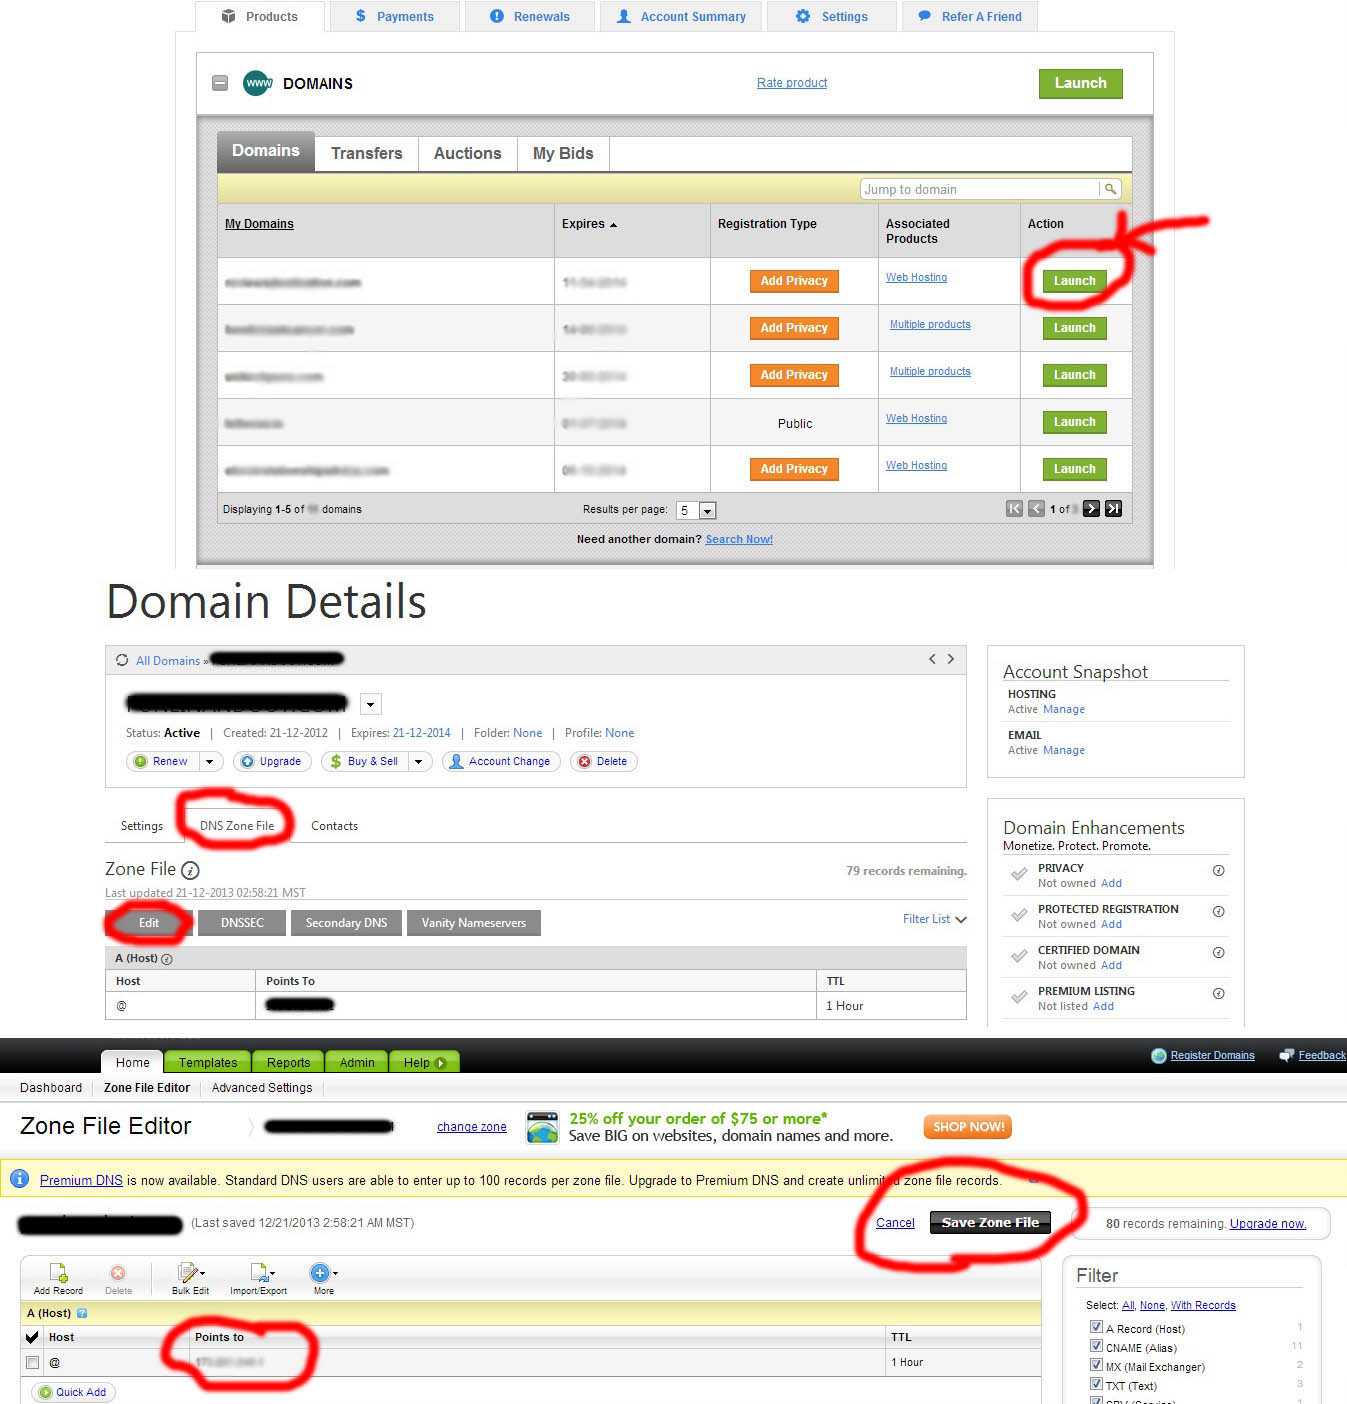
- Go to your Account
- Select Domains and click Launch in front of your Domain name
- This takes you to the Domain Details for that domain
- On this page select the DNS Zone File and click on Edit which redirects you to the Zone File Editor page
- On this page edit the Host record, changing it’s ‘Points To’ column with the IP Address of your hosting server
- Once done, click on ‘Save Zone File’
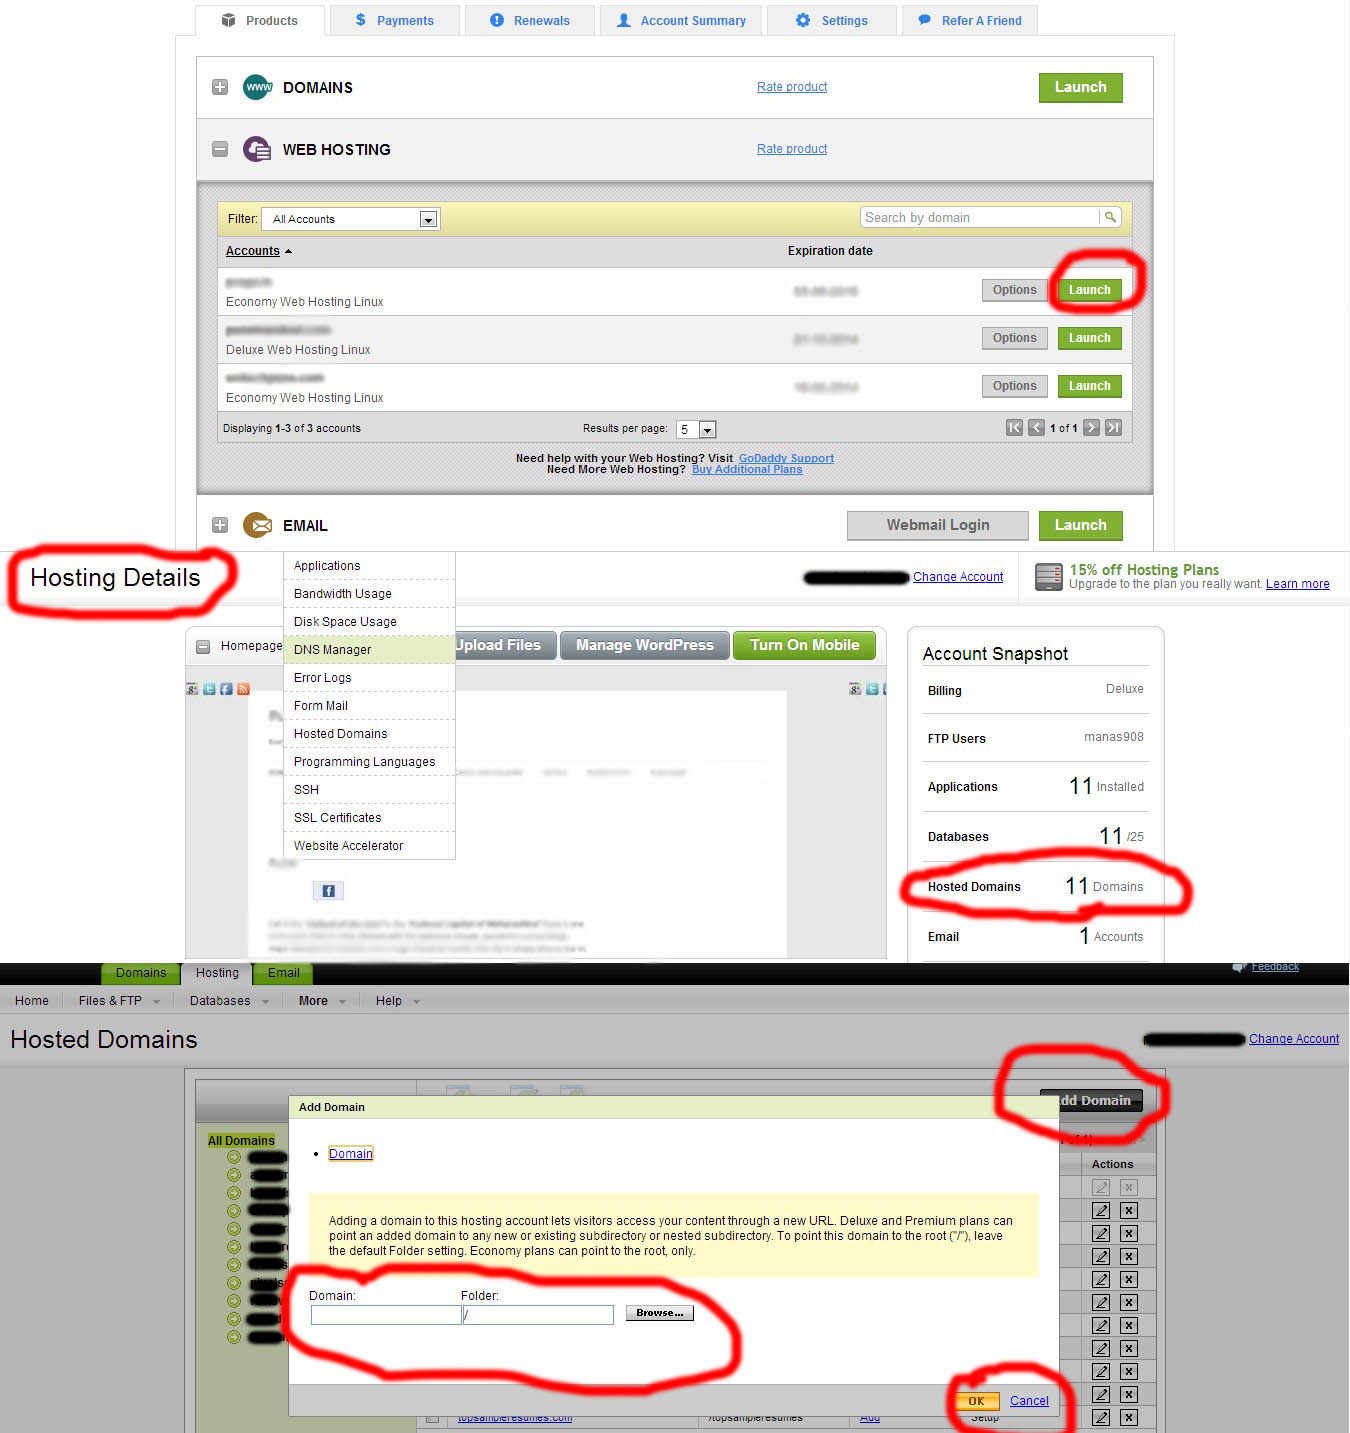
#6 Adding Your Domain Name to the Hosting Server
Once you sync your domain name with your hosting server, the next thing you need to do is add your domain name on to your server space. The below given steps and image will guide you about the same.
- Go to your Account
- Select Web Hosting and click Launch in front of the Hosting Plan
- Once on the Hosting Details Page, select Hosted Domain from the right side bar with redirects you to the Hosted Domains page
- On this page click on ‘Add Domain’ that gives you a pop-up asking for the domain name and the folder you want to save it in. Fill these fields and hit Ok
- Once done, the domain name appears in the table here with the status column indicating Pending. Wait till the status here changes to Setup.
- On changing the Status column from Pending to Setup, return to the Hosting Details Page by clicking on Home in the menu bar
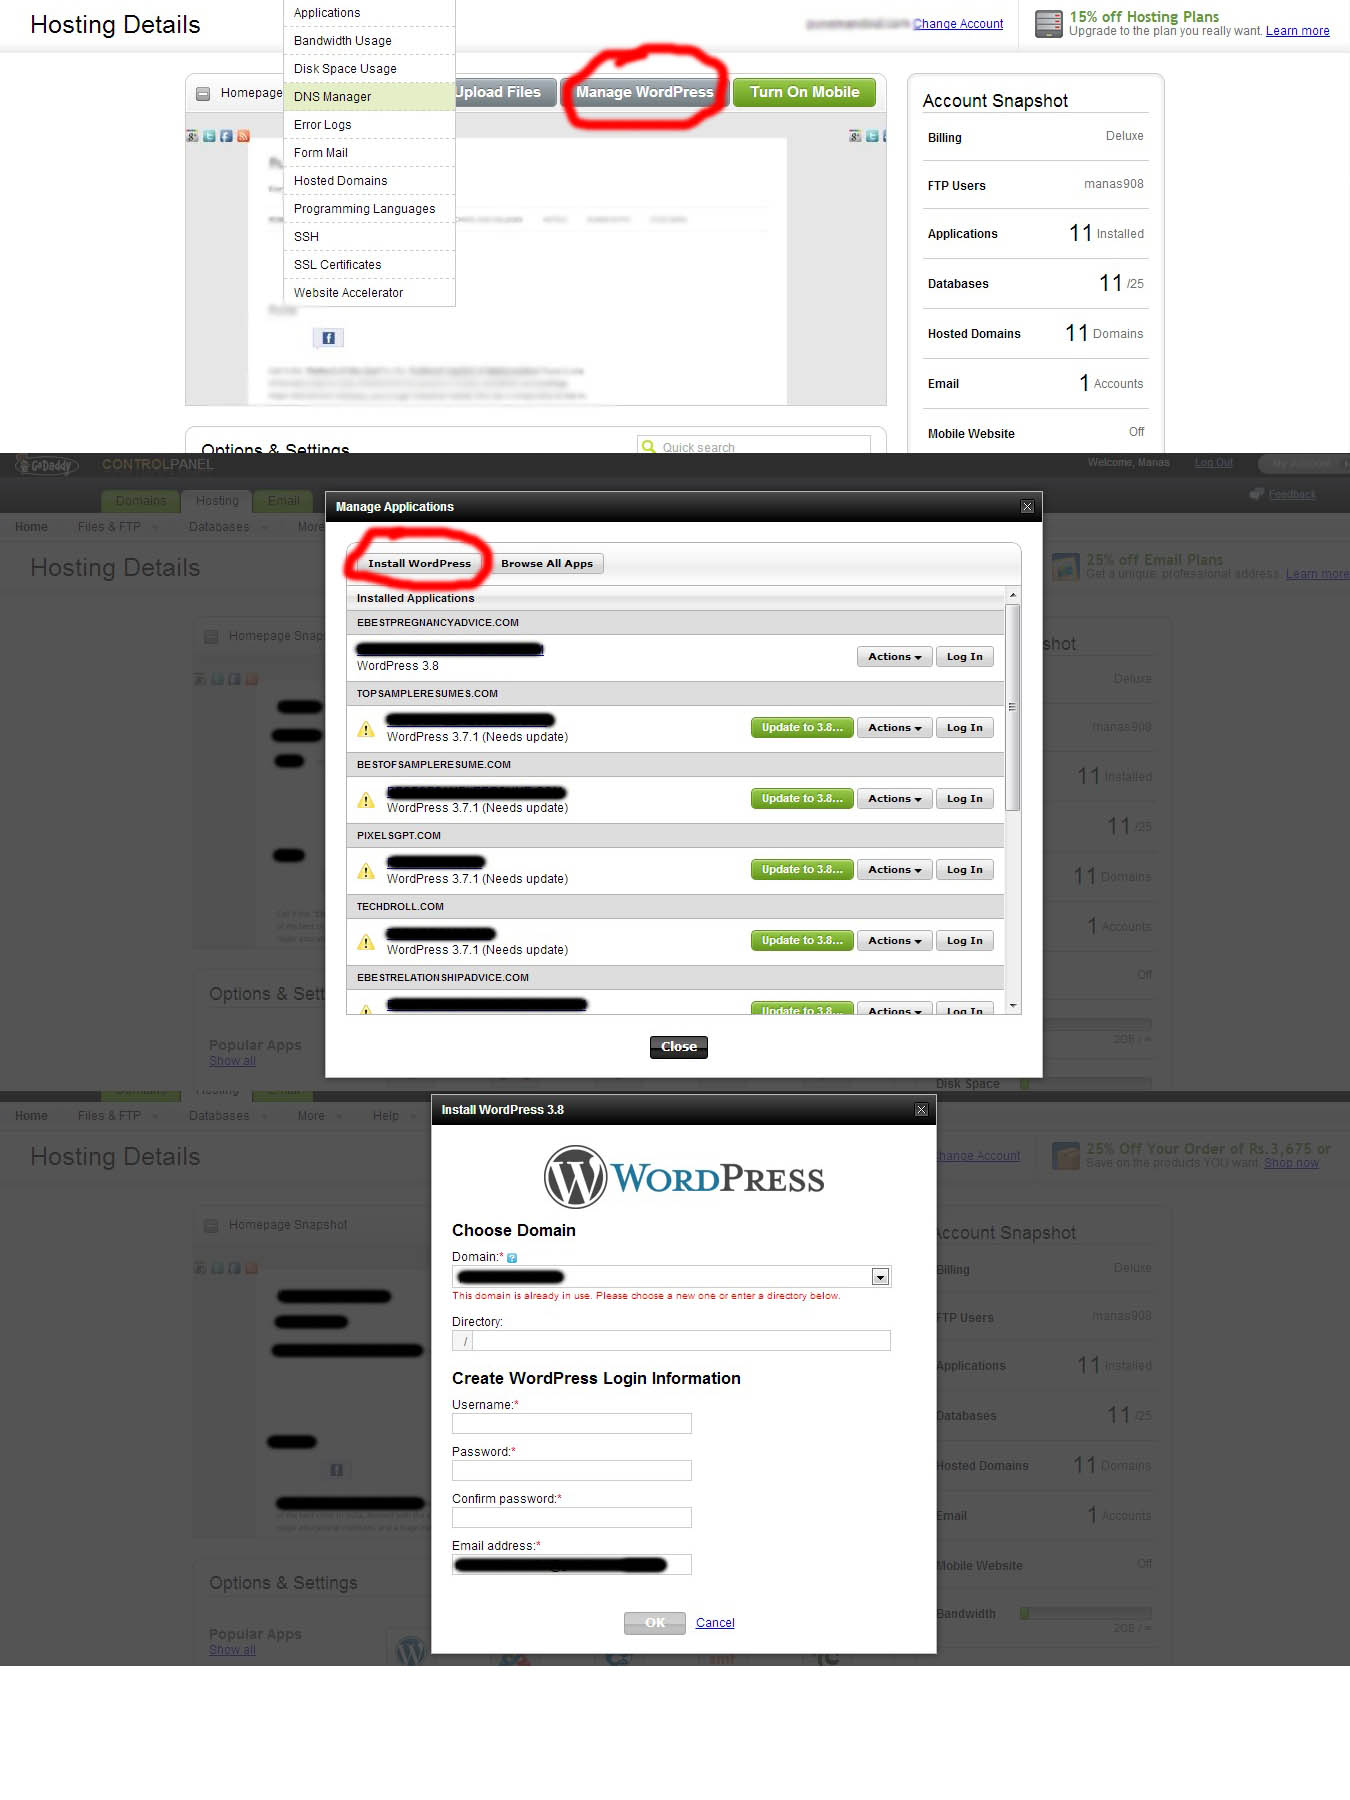
#7 Installing WordPress on Your Website
Syncing and adding your domain name to your hosting space almost completes your task of creating a website. Now the question arises, how to upload the content onto your website? Installing the WordPress CMS is an ideal answer to this question. The below points will guide you on how to install this CMS on your website.
-
• Once on Hosting Details Page, click on Manage WordPress which will give you a pop-up
• On this pop-up, select Install WordPress which opens up a yet another pop-up
• Fill in the details like the domain name, directory, username password and email and click ok
• WordPress start getting installed on your domain and hosting server
Once the WordPress is installed on your domain and hosting server, you receive an email for the same. This email then holds a link to your website. Clicking on this link takes you to your website. Here you get a link to log in to your newly setup WordPress website. If you are unable to get this link, type – www.yourdomainname.com/wp-admin in the URL bar where it asks you the username and password.
Signing in your WordPress website then takes you to your website dashboard. My post on ‘The Perfect WordPress Guide for Newbies’ will further guide you on how to use the dashboard and how to make your website all the more alluring.
Hope this post helps all the newbies to create a website without much effort.